

Working with deposits
A Deposit is a working area: a set of files on their way into the repository, plus the METS file that describes them. The Deposit page is where most of the work in this application happens — uploading files, arranging them, describing them, running tools over them, and finally turning them into a new version of an Archival Group.
This page covers the deposits list, the several ways of creating a deposit, and everything on the Deposit page itself. Running the import job that preserves the result has its own page: Import jobs.
The deposits list
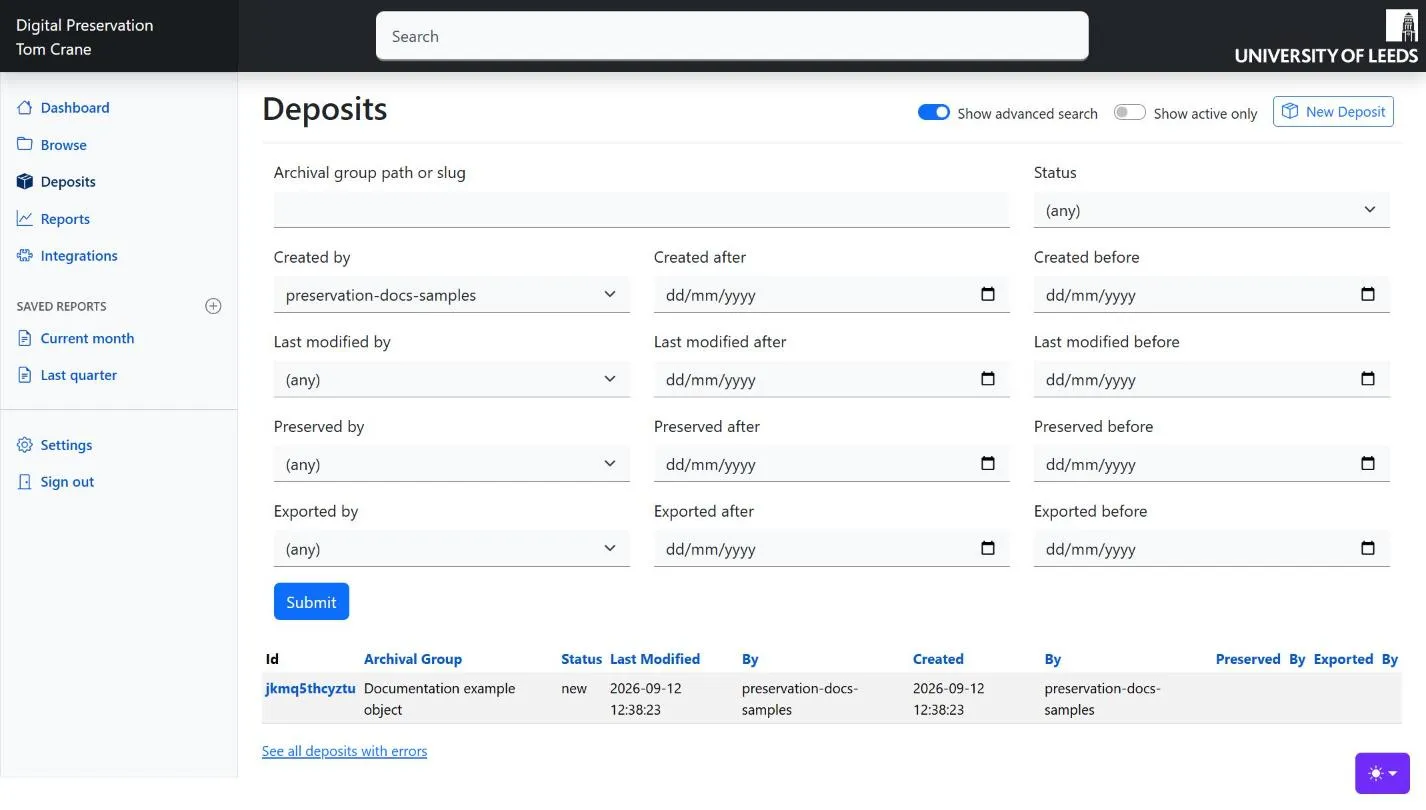
Section titled “The deposits list”Deposits in the sidebar lists deposits newest first. Two switches at the top change what you are looking at:
- Show active only, on by default. A deposit stops being active once an import job has run for it, so the default list is work in progress rather than history. Turn it off to see everything.
- Show advanced search, which opens a panel of filters.
Every column heading is a sort link; clicking the one you are already sorted by reverses the direction. Deposits whose status is error are highlighted in red, and there is a standing link at the foot of the table to See all deposits with errors.
The advanced search panel filters on the archival group path, the status, and on who did what and when — created, last modified, preserved and exported each have an agent dropdown and a pair of date boxes. The agent dropdowns are populated with the agents the platform actually knows about, so you are choosing from real names rather than typing one. These map onto the deposit query parameters.
Creating a deposit
Section titled “Creating a deposit”There are four routes in, and which one you use decides what the deposit starts out as.
From the deposits list
Section titled “From the deposits list”The New Deposit button here is for an object you can identify but have not placed in the repository yet. Give it an identifier — an IRN, PID or other identifier the Leeds identity service understands — and the platform looks the record up and fills in the intended path and the object’s name for you. See creating a deposit from an identifier.
Without an identifier you can still create a deposit with just a name and a note, and decide where it is going later. A deposit does not need to know its Archival Group until you come to run an import job.
The Use BagIt layout tick box changes the shape of the workspace: everything sits inside a data/ directory, ready for the contents of a BagIt bag. Leave it unticked for the ordinary layout. Either way the platform creates and manages the METS file; see Templates.
From Browse, for a new object
Section titled “From Browse, for a new object”The New Deposit button on a Browse page that is not an Archival Group creates a deposit for a new object inside the folder you are looking at. As well as the name, note and BagIt option, it asks for the path of the Archival Group the deposit will eventually create, and shows you the full path it will make as you type. As with folder names, the path is suggested from the object name and only permits safe characters.
This route checks a good deal before it creates anything, and tells you why if it refuses: there is already an active deposit for that path; something already exists there; the parent folder does not exist, or is not a folder, or is itself inside an Archival Group; or you are trying to create an object directly at the repository root, which is not allowed.
For an object that already exists
Section titled “For an object that already exists”The New Deposit button on an Archival Group creates a deposit aimed at that object, so an import job from it will produce a new version rather than a new object.
The dialogue offers Export to S3. Ticking it copies the object’s current contents into the deposit’s workspace before you start work:
- Export when you need the files themselves — to replace one, to check a file against what is preserved, or to work with the real content.
- Don’t export when you are only adding files, or only changing the METS. The deposit will show the object’s existing files as being in the METS but not in the workspace, which is normal and is exactly what the diff expects.
Exporting a large object takes time. While it is happening the deposit’s status is exporting and the page tells you so; there is nothing useful to do until it finishes.
From a particular version
Section titled “From a particular version”New Deposit from vN on the versions page always exports, and exports that version. Choosing anything other than the latest version is flagged with a warning, because preserving what comes back would make the old content into the newest version.
The Deposit page
Section titled “The Deposit page”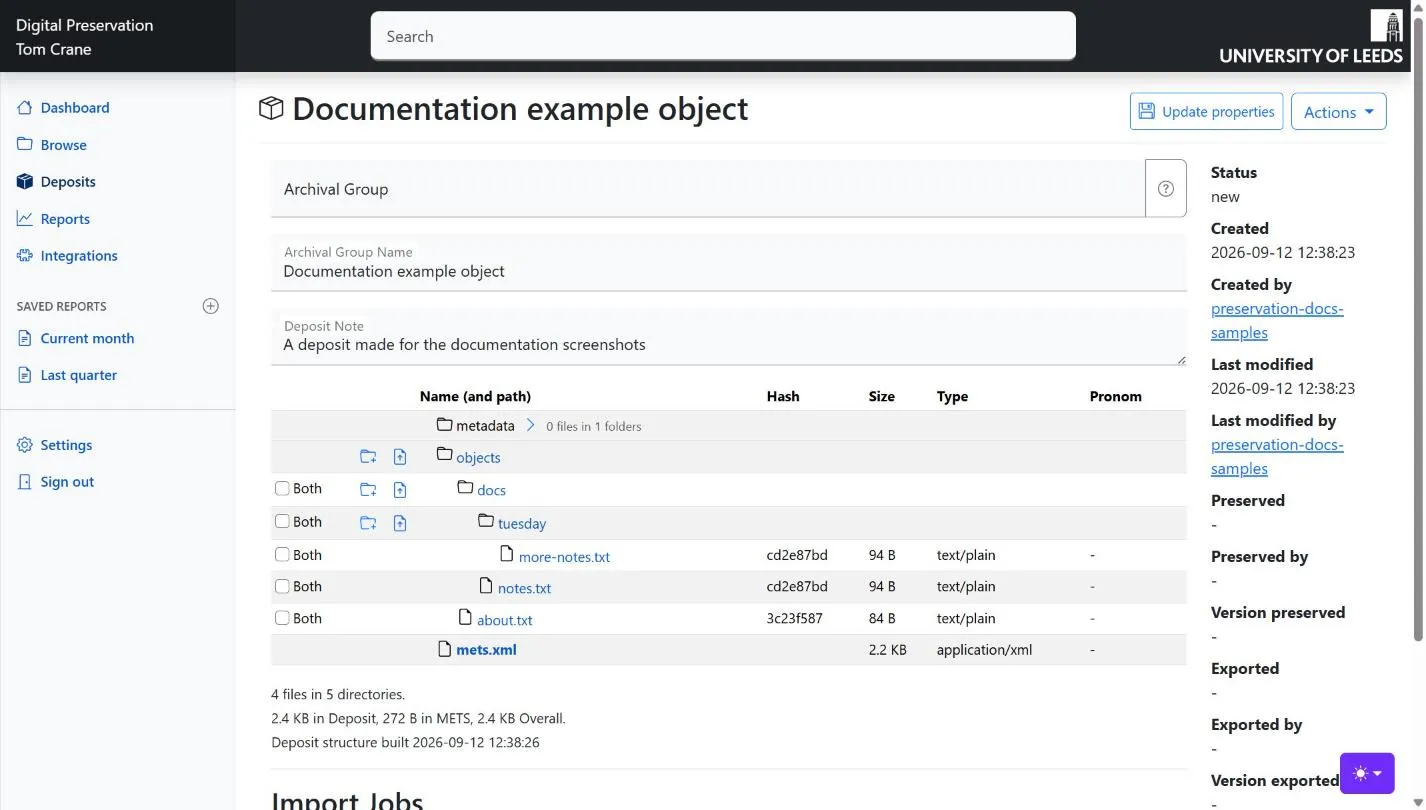
The page has four parts down the middle — the deposit’s properties, the file table, the import jobs, and the pipeline jobs — with a summary panel on the right and an Actions menu at the top.
Properties
Section titled “Properties”Three editable fields, saved together with the Update properties button at the top of the page:
| Field | Notes |
|---|---|
| Archival Group | The path of the object, below the repository root: digitised/manuscripts/ms-342, not a full URL. You can paste a full URL or a /browse/… path and the form will tidy it up. Once the object exists this becomes read-only unless you click Edit beside it, which you should need only if it was set wrongly. |
| Archival Group Name | The object’s title. Needed when the import job will create the object; an update runs without one. |
| Deposit Note | Free text, for you and your colleagues. |
If you type a path that the platform cannot accept, a warning appears beneath the field when the page reloads — the API is asked to validate the path, and its answer is shown verbatim.
The whole form is disabled when the deposit cannot be worked on: when it is locked by somebody else, when it is no longer active, or while it is exporting.
The side panel
Section titled “The side panel”The right-hand panel is the deposit’s history: status, created, last modified, preserved, exported and archived, each with the agent who did it, plus the versions preserved and exported. Toggle side panel in the Actions menu hides it, and the UI remembers your choice.
The file table
Section titled “The file table”The central table is the deposit’s contents, and it is the thing to understand. It is not a listing of the workspace and it is not a reading of the METS: it is the two merged, one row per file or folder, which is what the platform calls the combined view.
The label beside each row’s checkbox is the important column. It says where that item is:
| Label | Meaning | What to do about it |
|---|---|---|
Both |
In the workspace and in the METS. | Nothing — this is the normal state. |
Deposit |
In the workspace but not in the METS. | Usually a file you have just uploaded. Add it to the METS, or delete it if it should not be part of the object. |
Mets |
In the METS but not in the workspace. | Normal on an update you did not export. The file is safely preserved; it is simply not here. |
The rest of the columns: the name (with the full path on hover), a links column, the first eight characters of the checksum, the size, the content type, the PRONOM identification, and a last column for the virus scan or a link to a tool report.
Some rows behave specially:
- The METS file is a link that opens the document itself as XML. It cannot be selected or deleted.
- The
metadatafolder is collapsed. Its row says how many files are in it, and the chevron expands it. These are tool outputs, not content — you generally do not need to look at them, and you are not allowed to delete them. - Files that are a tool report (Brunnhilde’s HTML report, for instance) are links that open the report in a new tab, rendered rather than downloaded.
- A file that failed a virus scan shows a red ☣, and the page carries a red banner listing every such file.
- The
objectsandmetadatafolders themselves, andmetadata/ad-hoc, have no checkbox: they are part of the structure and cannot be removed. - A BagIt deposit says so in a line at the top of the table, and its BagIt files are hidden.
Beneath the table is a count of files and directories and three totals: the size in the deposit, the size according to the METS, and the overall size. If those disagree for any file, a red Discrepancies in file sizes box lists the offenders.
Uploading a file
Section titled “Uploading a file”The upload icon on a folder row opens the upload dialogue for that folder. Choose a file and the browser does three things immediately: it computes the file’s SHA-256 checksum locally and shows it, fills in the file name and content type from the file itself, and shows the size.
The checksum is computed in your browser, before anything is sent, and travels with the upload so the platform can confirm the bytes arrived intact. It is not editable, and Upload file stays disabled until it is ready. You can change the file name the platform stores, and the content type if the browser guessed wrongly or said nothing.
Two rules the dialogue will not let you break: files must go in or below objects/, and the name must not clash with something already in that folder.
Creating folders
Section titled “Creating folders”The folder icon on a folder row creates a new folder inside it. As elsewhere, the name you give is stored as the folder’s real name while the path segment is made URL-safe, and a name that clashes with something already there is refused. Folders cannot be created inside metadata.
Adding files to the METS
Section titled “Adding files to the METS”Uploading a file puts it in the workspace. It becomes part of the object only when it is in the METS, and that is a separate, deliberate step — partly because you may not want everything in the workspace preserved, and partly because you want the tools to have run before you record what they found.
-
Tick the files and folders you want. Select all non-METS in the Actions menu ticks everything marked
Deposit, plus anything whose metadata disagrees with the METS. -
Choose Add selected to METS. The dialogue lists what you selected; if nothing valid is selected it says so and the button stays disabled.
-
Confirm. The platform writes those entries into the METS, together with all the metadata it has collected about them from tool outputs.
Adding something that is already in the METS updates it rather than duplicating it, which is exactly what you want after running the pipeline. Parent folders are created for you, but a folder you select is only the folder — its files are not pulled in with it. The details are in Editing the METS file.
Deleting files and folders
Section titled “Deleting files and folders”Select rows and choose Delete selected… from the Actions menu. The dialogue lists what you selected and makes you choose between:
- Delete from Deposit and METS file (if present) — the ordinary choice. The file goes from the workspace, and its entry goes from the METS.
- Delete from Deposit only — available only when the Archival Group already exists. The file leaves the workspace but stays in the METS, so the import job does not treat it as a deletion. This is how you drop a file you exported but did not intend to change.
Neither button is enabled until you pick one. Things that cannot be deleted: anything in the metadata folder (the dialogue refuses the whole selection and says how many such items you picked), the objects folder itself, and a folder that still has files in it — delete the files first, and select both the folder and its contents together.
Access conditions, rights and record identifiers
Section titled “Access conditions, rights and record identifiers”Clicking the name of a file or folder (rather than the row) opens the metadata dialogue for it. This is where the object is described for access purposes, and it holds four things.
Access Restriction(s) — a multi-select of the access conditions this platform recognises, fetched from the API’s vocabulary so the list is always the current one. Ctrl+click deselects.
Rights statement — a single choice from the rightsstatements.org and Creative Commons vocabularies, plus two special entries at the top which are the subtle part:
| Choice | What it means |
|---|---|
| (inherit from parent) | This item asserts nothing. It takes whatever applies further up. |
| (none — do not inherit) | This item asserts that it has no rights statement, and inheritance stops here. |
Those two are not the same thing, and the difference survives into the preserved METS. The first leaves the item silent; the second records an explicit, empty assertion, which is the only way to say “the statement on the folder above does not apply to this file” without putting a different statement on it.
Record Identifiers — pairs of a source and a value, identifying the catalogue record this item corresponds to. Add another adds a row; the sources offered are configured per instance (at Leeds, EMu and the Identity Service). If a file already carries an identifier from a source that is no longer in the list, that source is kept as an option so you do not lose it by saving.
File Links, for files only, relate one file to another — a transcript to its recording, captions to a video. Choose a role and a target file and click Add. Linked files show arrows in the table’s links column: → from the file that declares the link, ← on the file it points at, and hovering either highlights the other row.
How inheritance works
Section titled “How inheritance works”Access conditions, rights and record identifiers are all inherited, and the file table shows you the result: a value in bold italics is set on that item itself. An inherited value is there too, but it is hidden until you hover over the row (or move focus into it), when it fades in. So in the ordinary Leeds arrangement — access set once on objects/ — the one file you have restricted shows its own value in bold at all times, and the rest look blank until you hover.
The rules the platform follows are worth knowing, because they are not simply “nearest ancestor wins”:
- A folder takes its own value if it has one, otherwise its parent’s effective value. Straightforwardly upward.
- A file takes its own value if it has one, then walks up the folder tree. For access and rights the physical tree always wins: only if nothing from the file up to the root says anything does the platform fall back to the logical structure, and then only when the file belongs to exactly one range — if two ranges disagree there is no safe answer, and the file is left with nothing.
- Record identifiers are the exception and go the other way round: a file’s single logical range is consulted before the folder tree, because the range is usually the catalogue record the file represents. A range with nothing to say does not erase what a folder above asserts.
- An explicitly empty rights statement stops inheritance rather than passing it on — the (none — do not inherit) choice above.
Logical structure
Section titled “Logical structure”The file table shows the object’s physical structure: the files as they are arranged on disk. An object can also have one or more logical structures — the archival arrangement, which need not match the folders at all: interviews on a tape, chapters in a book, items in a series.
Create logical structure in the Actions menu adds one. The page then grows tabs above the file table: Physical for the file table you already have, and one tab per logical structure.
A logical structure is a tree of ranges, each with a name, a type (from the vocabulary the API supplies) and a list of files. Every row has icons for the things you can do to it:
| Icon | On a range | On a file |
|---|---|---|
| ↑ ↓ | Move the range among its siblings | Move the file within its range |
| Folder-plus | Add a child range | – |
| File-plus | Add files, from a searchable picker of everything under objects/ |
– |
| Info | Set access, rights and record identifiers for the range | – |
| Pencil | Edit the name and type | Edit the extents — a time segment, or a rectangle on an image |
| Trash | Delete the range and everything in it | Remove the file from the range |
Files can also be dragged: onto another file to place them precisely, or onto a range to move them into it.
Edits here are held in your browser until you save. The tab shows a pulsing dot while there are unsaved changes, the Save button turns amber, and the browser warns you if you try to leave the page. Delete removes the whole structure, and does not touch the files or the physical structure.
Running the pipeline
Section titled “Running the pipeline”Where the instance has it enabled, Run pipeline in the Actions menu sends the deposit’s objects/ folder off to be characterised: format identification, virus scanning, and the rest. What it does is described in Tool outputs and pipelines.
Starting a run locks the deposit in your name. While it runs, a green banner says a pipeline is being run and asks you to refresh for updates — the page does not update itself — and almost everything in the Actions menu is disabled. When it finishes, the tool output lands in the metadata folder and the file metadata becomes available; select the files and add them to the METS again to record it.
Stop pipeline run is the way out of a run that has not come back. It marks the job as completed with errors and releases the lock. It is only available while a run is outstanding.
The Pipeline Jobs table at the foot of the page lists every run for this deposit with its status, when it began and finished, who ran it, and any errors.
Locking
Section titled “Locking”Lock deposit marks the deposit as yours. It does not physically prevent anything — people with access to the workspace can still change files there — but while it is held, the API refuses edits from anybody else, and this page shows them a red banner saying who has it and disables their controls.
You do not need a lock to work on a deposit. Take one when you are about to do something you would rather nobody else interrupted; running the pipeline takes one for you. Release lock gives it back, and anybody can release a lock, which is deliberate — a lock left behind by somebody on holiday should not stop work. See Locking a Deposit.
Activating and deactivating
Section titled “Activating and deactivating”A deposit becomes inactive once an import job has run for it, successfully or not, and an inactive deposit cannot be worked on.
The Activate Deposit and Deactivate Deposit entries appear in the Actions menu only when the deposit’s status is error — that is, when an import job finished but did not succeed. Activate is how you pick the work back up, fix whatever the job complained about, and try again. Deactivate is the way to abandon it. There is deliberately no way to retire a deposit out of the middle of a piece of work; the API refuses it.
Archived deposits
Section titled “Archived deposits”A workspace does not live forever: once a deposit is finished with, the deposit archiver packs it up and the status becomes archived. The page then shows “This preserved deposit has been archived” and everything in the Actions menu is disabled. The record of what happened is intact, and so is the preserved Archival Group — only the working copy of the files has gone.
Housekeeping actions
Section titled “Housekeeping actions”Three more entries in the Actions menu, all to do with the platform’s view of the workspace rather than the workspace itself.
| Action | What it does |
|---|---|
| Refresh storage | Re-reads the workspace from storage and rebuilds the platform’s cached view of it. Use this after putting files in by any means other than this page. |
| Validate storage | Compares the cached view against what is actually in storage and tells you whether they agree. It changes nothing. |
| Open Deposit location | Opens the deposit’s workspace in the AWS S3 console, in a new tab. Useful if you have S3 access; not much use if you do not. |
The platform keeps its view in a file in the workspace rather than re-listing it on every page load, because listing a large deposit is slow. That is why files put there by other means do not appear until you refresh. See the note on caching.
Normalising METS identifiers
Section titled “Normalising METS identifiers”Where the instance has it enabled, Normalise METS IDs rewrites identifiers inside the METS that are not legal XML IDs into the form the platform mints now, following every reference to them. It exists for a one-off migration of documents written by an older version of the platform; the background is in Identifiers in METS.
It is safe to use on a deposit that needs nothing: it says “METS IDs already conform — nothing was changed” and writes nothing, which matters, because preserving an unchanged document would give the object a pointless new version. When it does change something it tells you how many IDs and references it rewrote, and reminds you to generate an import job to preserve the change. A document with duplicate IDs is refused outright and left for a person to sort out.
Deleting the deposit
Section titled “Deleting the deposit”Delete Deposit removes the deposit and everything in its workspace. The dialogue requires a tick box before the button is enabled. It has no effect on an Archival Group already created from this deposit — a preserved object is preserved. A deposit locked by somebody else cannot be deleted.
Preserving the result
Section titled “Preserving the result”When the files are right, the METS is in step with them and the name and path are set, the Create diff import job button below the file table works out what preserving this deposit would do. That is the subject of the next page.
The button is not offered at all when there is nothing to run: no Archival Group path set, no valid files in a deposit for an object that does not exist yet, a deposit that is no longer active, or an export still in progress. The page says which of these it is. Create custom import job — writing the job by hand — is not implemented in the UI; it can be done through the API.